How Drywall Installation Is Done Right

Drywall Installation Naperville is a detailed process that makes a huge difference in the look and quality of your home. Read on to learn how to get it done right, whether you’re doing the work yourself or hiring a pro.

Start by ensuring that your framing is ready to hold drywall. Then, cut your drywall sheets to length and use a T-square as a guide when cutting.

Drywall is in your home and business, it’s in every store you walk into. But, for many people, this common construction material remains a mystery. Whether you’re installing drywall as part of a new construction or renovation project, or repairing existing walls, there are some best practices to keep in mind. These drywall installation techniques will ensure your work is professional, and create a finished product that meets or exceeds your expectations.

The first step in a successful drywall installation is proper planning. This includes assessing the space and determining how much drywall is needed to cover all walls and ceilings. Often, it’s best to purchase a little more than you need. This way, if you run out midway through the project, you still have enough to complete the job.

Choosing the correct type of drywall is also critical for success. Depending on the space, you may need standard drywall, moisture-resistant drywall for bathrooms or basements, or fire-resistant drywall for kitchens and garages. Each type of drywall has specific advantages and applications, so it’s important to know which one is best for your space before you start working.

Once the drywall is up, the next phase is taping and mudding. This is the process of creating seamless joins between panels, which is critical for a clean finish. To do this, you’ll apply a layer of joint compound (also called mud) over each seam, then place a strip of drywall tape over the wet mud. Then, you’ll apply additional layers of mud and tape, feathering out the edges with each application to make them blend seamlessly into the wall.

This is a time-consuming process, and it takes patience to do it correctly. It’s important to plan ahead and allow plenty of time for each coat of mud to dry before applying the next. This will help you avoid common mistakes, like driving screws too deep and tearing the paper. The result is a smooth surface that’s ready for paint or other decorative finishes. Taking the time to follow these steps can help you save a lot of time and frustration in the long run.

Layout

Drywall installation requires effective planning in order to minimize seams and waste. It’s important to measure the space and accurately determine how many full sheets of drywall are needed for the job. It’s also helpful to calculate the number of wall and ceiling angles and drywall heights to plan your layout accordingly. This will ensure that your drywall is evenly spaced and will be a good fit when it’s installed.

It’s often necessary to add an extra row of drywall to the bottom of walls and ceilings, especially for rooms with low ceilings. This is usually done for structural reasons, but it can be a result of the room size or the type of flooring being installed. This additional row of drywall will prevent gaps or “butt joints” in the finished surface.

The direction that drywall is hung can have significant consequences on the final appearance of a room. If a house has wood stud framing it is best to hang drywall sheets parallel to the studs, or “railroad style.” This will allow the bound edge of each sheet to land directly on a stud and provide an adequate backing. However, this technique will not work well with metal stud framing and is better reserved for commercial jobs.

Another important consideration in the layout phase is how to handle openings for doors, windows, electrical outlets and switches. It’s important to carefully mark these locations on the drywall before cutting, and it’s often necessary to use a keyhole saw or jigsaw to create the openings. These tools are suitable for making precise, controlled cuts and will help avoid damage to surrounding drywall.

For areas around electrical outlets and switches, a reinforcing corner bead should be installed. This will protect the corners from damage, and it’s commonly made of plastic or metal. It’s also a good idea to install these areas before the first row of drywall is installed to ensure that it is positioned correctly.

Butt seams, where the long edges of two pieces meet or “butt up against” each other, are a common issue with drywall. These seams are difficult to tape and mud because of the bump created, and they are susceptible to cracking from structural movement or lumber shrinkage/expansion. A common way to avoid butt seams is to orient drywall sheets so that they always have a tapered edge, which will provide a smoother surface for mud and tape.
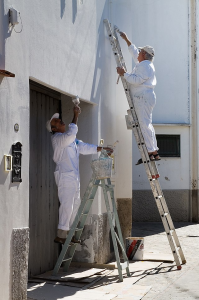
Hanging

If you’re not quite ready to hire a pro for the finishing stage, it’s worth investing the time to learn to hang drywall properly. It will save you a lot of money in labor costs. This phase is the first step in the process of transforming a space from blank slate to finished room and it’s important that it is done well. If you don’t, it will be much harder for the finisher to get good results.

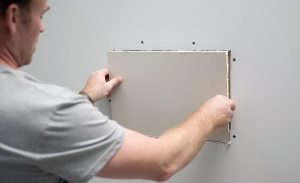
Start by cutting the drywall sheet to the appropriate length. Use a level to make sure the top and bottom of the drywall are in a straight line. If it isn’t, you will have to work more carefully when it comes to taping the drywall seams later.

When you’re ready to hang the first piece, mark the location of the cut on the back side of the wallboard. This will help you align the drywall correctly when it’s installed. Then, score the drywall with a utility knife along the marking. You can also use a drywall saw for this step, but this will take more time and skill to master.

Once you have a sheet of drywall in place, screw it into the studs at the corners and then in each row. It’s helpful to stagger these screws so you don’t have an entire wall or ceiling full of holes and loose drywall.

If your drywall is going to be around electrical outlets or light switches, be sure to turn off the power before you begin working. Measure the height and width of the outlet or switch box from panels above, then transfer that measurement to the drywall sheet. Once you’re ready to cut, be sure you have a tool that can safely cut through the wires within the outlet or switch box.

You can cut all the drywall you need before beginning the project, or you can cut as you go. It’s usually faster to cut pieces as you go and this method can also reduce waste. If you’re using a drywall saw, wear a face mask and eye protection to avoid breathing in the dust.

Finishing

The finishing phase of drywall installation involves applying several rounds of joint compound (also known as “mud”) and sanding to create a smooth surface that’s ready for painting or other wall treatments. Drywall installers also repair any damaged sections of drywall and ensure the seams and joints look seamless. Depending on the project, this phase can take anywhere from a few days to a week.

The mud is mixed to a consistent texture and applied with a drywall taping knife across the seams and joints between drywall panels. Then a hand or pole sander is used to sand the mud down, producing a smooth, even finish. The process can be tedious, especially when there are many walls and ceilings to cover.

When sanding, it’s important to use a fine-grit sandpaper and go over all surfaces, not just the visible areas of the wall. This is to ensure the entire drywall is smooth and to remove any paper residue or fluff that may have been left from the original sanding. Using a power sander with a fine-grit sandpaper is generally not recommended, as it can leave swirl marks and scratch the drywall.

Another step is to add a skim coat of joint compound over the sanded surface. This step is optional, but can help to improve the appearance of a wall or ceiling and is necessary when the area will receive high amounts of natural light or specific paint treatments.

Other common challenges in the drywall finishing phase include nail pops, which are small protrusions caused by shrinking framing or improperly installed nails or screws. These can be difficult to fix and may require the drywall installer to cut out and replace the damaged section.

For the most accurate drywall estimations, it’s best to have your drywall professional measure the room ahead of time to make sure all the drywall sheets are the same size. This will eliminate waste and prevent costly mistakes. It’s also a good idea to do any prep work yourself, such as clearing the area and removing old wall coverings, so you can reduce the amount of labor your professional needs to complete the job.

What Does a Painter Do?

Painter Fresno CA applies paint and other decorative finishes to surfaces. This includes walls, furniture, and other interior or exterior surfaces. Painters may also prepare and clean equipment.

Some painters work in art institutions or as artists-in-residence. Others are hired for commissioned painting projects. They can also work from home or in a studio.

Painting is one of the oldest forms of visual art. It is a medium for the expression of ideas and emotions through color, shape, line and texture. The medium is usually oil paints but other types of paints may be used. The paint is brushed onto the surface of a prepared canvas or piece of wood. The surface is then coated with varnish to protect the work.

There are many different styles of painting, ranging from realism to abstract and impressionism. Each style has its own technique and tools. In the beginning, it is common to draw a rough outline of the composition before starting to paint. This helps to ensure that the important shapes of the composition will be placed where they should be. It is also helpful to determine the colors and their placement before starting.

The painter must be skilled in using the materials of the painting as well as observing and interpreting what they are seeing on the canvas. It is also necessary to be able to communicate to the viewer what they are seeing by creating depth, movement and light.

Depending on the cultural tradition of the artist, the subject matter of a painting can vary. Early paintings were often created for ritualistic or decorative purposes and therefore reflected the beliefs and practices of the people that viewed them. Later, painters became more creative and began to use their works as an outlet for emotion.

One of the most challenging aspects of painting is developing a consistent style. This requires a lot of practice and experimentation. The best way to become a more consistent painter is to focus on the fundamentals of composition, value, and color. This will help you achieve a higher level of skill more quickly.

The process of painting can be very meditative and can also provide a release for feelings that may be too difficult to express verbally. Many therapists recommend that their patients take up painting or drawing as a form of emotional expression.

Painting is an activity that allows homeowners to personalize their living spaces. Interior painting can create a calming environment for relaxation, or vibrant colors can energize a space. Exterior painting can be an opportunity to keep up with design trends and make a home look newer and more appealing to potential buyers.

Decorating

A painter is someone who applies paint, wallpaper and other decorative finishes to walls, ceilings, wood trim, doors, windows and furniture. They may also perform related tasks, such as sanding and priming surfaces, filling cracks in walls and ceilings and repairing damaged trim. Many people enter this career with no formal education but are able to learn through on the job training. Others take a short course at a local college to improve their skills and knowledge.

When hiring a painter, you should check their credentials and experience before making a decision. You can also check their online reviews to see what other customers have to say about them. You should also ask for a quote before the work begins so that you know how much it will cost.

Painters should be able to provide you with an estimate of both direct and indirect costs. The direct costs are the labor and materials used for the project, while the indirect costs are the monthly payments on equipment and work trucks, overhead and the salaries of support staff. Indirect costs are often overlooked by customers and can add up quickly.

Professional painters and decorators will likely have their own team of workers so they can keep working quickly to complete the project on time. This can save you a lot of stress and inconvenience, as it means you don’t have to deal with the mess and disruption yourself.

Painting and decorating is a complex process, so it’s important to hire a professional for the job. They will be able to give you advice on what type of paint and finishes are best for your home, and they can answer any other questions you might have. They will also be able to give you an accurate timeline for how long the work will take, so you can plan accordingly.

Before starting any work, a painter should walk through the site and take measurements. They should also discuss the desired outcome with the client, including any special requests or restrictions. During the walk-through, the painter should also talk about any safety concerns that need to be addressed. This is an important step to ensure that the job is done safely and correctly.

Interior Design

Interior design is more than just making your house look pretty, it’s about creating a functional space that fits your needs. It involves careful planning, choosing the right materials, and designing the perfect lighting. It’s also about being eco-friendly, following the rules, and staying up to date with the latest trends in the industry.

If you’re interested in becoming an interior designer, it’s important to know how this profession works. The best way to do this is to start by getting professional training. This will help you understand how to approach a project from a global and more conceptual point of view. Once you’ve completed your training, you can start applying your skills to real-world projects.

One of the most important parts of interior design is finding a focal point. This can be done by highlighting a piece of furniture, accentuating certain colors, or adding contrast to an area. This focal point will help draw attention and create a sense of balance and harmony in the room.

Interior designers are highly skilled professionals who are able to create environments that are both functional and aesthetically pleasing. They are knowledgeable about a variety of topics, including building codes, construction documents, occupancy loads, healthcare regulations, and sustainable design principles. They also have the ability to effectively manage and coordinate the work of other professionals involved in the construction process. This includes coordinating with architects, engineers, and contractors. They can also advise clients on the selection of fabrics, paints, wall coverings, furniture, and other interior finishes.

Exterior Design

The exterior design of a home is important because it creates a first impression and influences people’s perception of the property. It also adds value to the house and increases its marketability. However, it’s a challenging process that requires the help of professional designers. Unlike interior design, exterior design includes the entire property, including outdoor spaces. It also focuses on the roof, siding, and other architectural features. Its purpose is to make the property look aesthetically pleasing and well-maintained.

The first step of the exterior design process is defining the type of structure and establishing the style. Then, the designer will select materials and colors. They will consider the climate, surrounding buildings and trees, and any landscape requirements. They will also determine the building’s footprint and the placement of windows, doors, and other features. They will use 3D renderings to visualize the final result.

Colors are an essential part of any home’s exterior. They communicate a message about the owner’s personality and lifestyle. They can be used to convey a rustic, earthy feel, a modern and minimalist aesthetic, or any other desired style. They should also be able to stand the test of time and withstand the elements. The color palette should be chosen carefully so that the colors complement each other and draw attention to the architectural features of the home.

In addition to color, the exterior design process focuses on materials and finishes. For example, wood accents can be incorporated to match the architectural style of the house. These details aren’t just decorative, but they can also increase a building’s energy efficiency and durability. They can also reduce water runoff and protect against the elements.

Choosing the right materials is critical to the success of any exterior design. The best materials will complement the architecture of the home and blend in with the surrounding environment. They will also be durable and easy to maintain. For example, a wooden facade can be paired with metal windows for a sleek and stylish look.

Exterior designers are a unique group of design professionals who combine skills from several disciplines, such as landscape architecture, construction, and interior design. They are a small group that is hard to find, but they can add value to a home and increase its marketability.